Milk texturing basics: how to steam microfoam, not bubbles
Good milk texturing means microfoam, tiny bubbles you cannot see individually, not the large loose bubbles a novice pours. Stretch first with the steam tip just below the surface, then submerge it to create a whirlpool that folds the foam in, and use a 12 ounce pitcher for a single drink since a larger pitcher makes one cappuccino harder to texture, not easier.
The goal of steaming milk is microfoam, a texture so fine the individual bubbles disappear into a glossy, paint like consistency, not the loose foam of a first attempt with visible bubbles on top. Getting there is a two stage motion: stretch first, with the steam wand tip held just below the surface so it pulls air in and the pitcher's note rises in pitch, then submerge the tip deeper to create a whirlpool that spins the foam into the milk below rather than letting it sit as a separate layer on top. A 12 ounce pitcher is the right size for one drink, because a larger pitcher spreads the same amount of milk thinner across the tip, which makes the whirlpool weaker and the whole process harder to control, not easier.
What is microfoam, and how is it different from regular foam?
Microfoam is milk steamed until the air bubbles inside it are too small to see individually, which gives the milk a glossy, slightly thickened texture closer to wet paint than to whipped cream. Regular foam, the kind that sits as a separate dry layer on top of a badly steamed latte, is made of much larger bubbles that formed because air was introduced too fast, too late, or both. The difference is not how much air went in, it is how fine that air got broken up before the milk finished heating, which is why technique matters more than time spent with the wand in the pitcher.
What does 'stretch then whirlpool' actually mean in practice?
- Stretch: position the tip just below the surface, angled slightly off center, so the milk pulls air in with a light hissing or tearing sound. This is where volume and foam get introduced, and it should happen early, while the milk is still cool.
- Whirlpool: once the pitcher feels warm to the back of your hand, submerge the tip deeper so the milk spins in a tight vortex rather than sitting still. The spinning motion folds the coarser foam from the stretch stage back into the liquid milk, breaking large bubbles into microfoam as it circulates.
- Stop by temperature, not by time: pull the wand once the pitcher is too hot to hold comfortably against your palm.
Skipping the whirlpool stage is the single most common mistake: stretching alone builds volume, but without the spinning motion afterward, that foam stays as loose, separate bubbles instead of being worked into a fine, pourable texture.
Why does pitcher size actually change the result?
A steam wand tip pulls air and spins milk at roughly the same rate regardless of how much milk is in the pitcher, so the ratio of milk to wand output is what actually changes with pitcher size. A 12 ounce pitcher holding milk for one drink keeps that ratio in a range where the whirlpool forms easily and the whole cycle finishes in well under a minute. A larger pitcher holding the same small amount of milk for a single cappuccino spreads that milk thin across a wider base, which weakens the vortex and makes it harder to fold the foam in evenly, not easier as it might seem with more room to work.
| Pitcher size | Best for | What goes wrong at the wrong size |
|---|---|---|
| 12 oz | One drink, cappuccino or flat white | Sized correctly, whirlpool forms easily |
| 20 oz | Two drinks steamed together | One drink in a 20 oz pitcher spreads too thin for a strong whirlpool |
| 32 oz plus | Batch steaming for several drinks at once | Wrong choice for a single cappuccino regardless of technique |
Does a machine with automatic milk texturing skip all of this?
Mostly, yes, for whoever is drinking the milk, though not for whoever is learning to steam it. The Breville Barista Touch Impress and other automatic milk systems dip a wand into a jug, sense temperature, and run a programmed stretch and whirlpool cycle without you touching anything, which gets a consistent microfoam texture reliably every time. That consistency is the entire selling point, and it comes at the cost of ever practicing the manual motion yourself. A manual wand on the Breville Barista Express or the Gaggia Classic Evo Pro takes longer to get consistent, but the skill transfers to any machine with a wand, while an automatic system only ever does the one thing it was programmed to do.
What temperature should the milk actually reach?
Milk tastes sweetest in the range most baristas describe as warm to the touch but not painful, commonly cited as somewhere in the 130 F to 140 F range, well before it feels scalding. Push much past roughly 160 F to 170 F and the proteins that hold the foam structure start to break down, which is what produces the flat, slightly sour smell of scorched milk and a foam that collapses quickly after pouring. A quick read thermometer is not standard barista kit, but touching the pitcher and pulling the wand once it is too hot to hold against your palm comfortably is the practical version of the same idea, and it works because that threshold sits close to where scorching starts.
Gear that fits these numbers
Everything mentioned on this page

Breville Barista Touch Impress
Assisted tamping plus automatic milk texturing. Expensive, and the honest question is whether you want to learn espresso or just drink it.
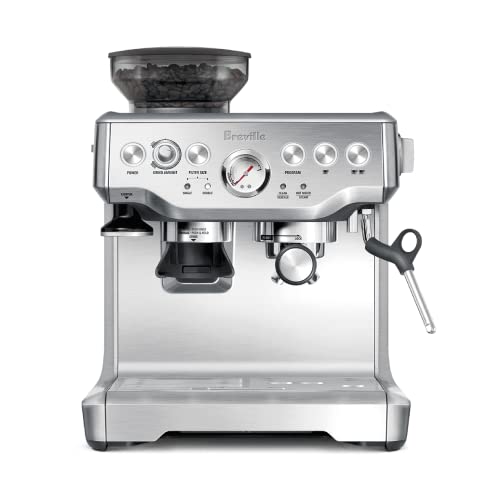
Breville Barista Express Espresso Machine
The machine that made home espresso normal. Built in grinder, manual tamp, and a steam wand you have to learn rather than a button.

Gaggia Classic Evo Pro Espresso Machine
A commercial 58 mm portafilter in a home machine, endlessly modifiable, and completely dependent on you owning a real grinder.
Prices when last checked. They change often.
Frequently asked questions
Why does my foam separate from the milk after I pour it?
Separation usually means the stretch stage added air but the whirlpool stage never fully folded it back in, leaving loose foam sitting on top of liquid milk rather than one blended texture. Submerge the steam tip deeper once the pitcher starts warming and keep the milk spinning until you cannot see individual bubbles on the surface. If the foam still separates after pouring, the bubbles themselves were too large to begin with, which points back to an aggressive stretch stage.
Can I steam plant based milk the same way as dairy?
The stretch and whirlpool motion is the same, but plant milks vary a lot in how they foam because they lack the specific proteins that stabilize dairy microfoam. Oat milk marketed for baristas tends to foam closest to dairy, while some almond and soy milks foam thinner or collapse faster no matter how carefully you steam them. Expect to shorten the stretch stage on plant milks that foam easily, since they can overshoot into large bubbles faster than dairy does.
How much milk should I steam for a single cappuccino?
About 4 to 6 ounces of cold milk in a 12 ounce pitcher is a normal starting point for one cappuccino, leaving enough headroom for the milk to expand as air incorporates during the stretch stage. Filling a 12 ounce pitcher much past halfway before steaming risks overflow once foam builds, while too little milk in the pitcher makes the whirlpool harder to sustain because there is not enough liquid mass for the tip to spin effectively.
Is the hissing sound during steaming supposed to be loud?
A light, controlled tearing or hissing sound during the stretch stage is normal and is literally the sound of air being pulled into the milk. A loud, sputtering, or spitting sound usually means the tip is too close to the surface or breaking the surface entirely, which introduces large bubbles rather than fine ones. If steaming sounds more like spitting than a steady hiss, lower the pitcher slightly to submerge the tip a little deeper.
Do I need an automatic milk system, or can a manual wand get the same result?
A manual wand on a machine with a steam wand can produce microfoam every bit as fine as an automatic system once you have practiced the stretch and whirlpool motion, and it works with any milk you hand it rather than only what a program was tuned for. The tradeoff is consistency while learning: an automatic system removes variance from the first day, while a manual wand takes practice before it stops being unpredictable.
Why does my pitcher matter more than my machine for milk texturing?
Pitcher size and shape control how the milk actually moves under the steam tip, and that movement is what turns air into microfoam rather than loose bubbles. A machine only supplies steam pressure and temperature; a pitcher too large for the amount of milk in it spreads the liquid too thin for a strong whirlpool no matter how good the wand is. Match the pitcher to the batch size, most often 12 ounces for one drink, before assuming a machine upgrade will fix inconsistent foam.
Sources
Published figures, quoted as published. We do not generate our own time and temperature data.
How we research: we compare manufacturer specifications, owner manuals, published USDA and FSIS figures and recurring themes in verified owner reviews. We do not cook test batches or run instruments, and nothing here is professional food safety advice. When a figure is not published by a source we trust, we say so rather than estimate one.